Talking Birds, Final Part

When I was a kid, trick-or-treating was all about going out after dark. Sure, we’d wear our costumes to school for show and tell or some more pointed Halloween activity. But costumes during the day? That was kids stuff. Literally.

The real fun started when it got dark. Usually about 6:00 it would be time to break out the flashlights and glow sticks. Remember when glow sticks first came out? I do. That was awesome.

My memory of childhood is flawed at best. I am sure that Halloween wasn’t quite as wonderful as I like to remember it. Still, I know two things: My Mother served dinner at 5:00 every one of my days growing up. And I would not have gone out without having eaten first.

Why then does trick-or-treating start so early? I need it to be dark.

Yes, there are visual effects I use that don’t work in daylight. I don’t want the “quality” of the display to be diminished for early arrivals, but really It’s about me. I don’t want people to see me. At 5:00, I’m still sweating my ass off trying to screw in that last light bulb. It’s not pretty.

Actually it was 7:00 when Ruth called to me on the roof. There was one last thing I needed to get working, but it was too late. Halloween was over.

The good news is that the talking ravens worked.

Did they provoke the reaction – the raw emotion that I expected? No. No they did not, but the technology held up. Here is proof:

[tube]http://www.youtube.com/watch?v=f1A9mhd0Uw0[/tube]

To my surprise, I had forgotten to video record the birds on Halloween. I made this video after pulling them from the lawn. I didn’t have it in me to run the cables back outside again. Still pictures will be in another post.

Next year I’ll make them say something different. I’m thinking of building a much more frightening centerpiece. I’ll probably have the birds react to whatever that is. We shall see…
Talking Birds, Part 5

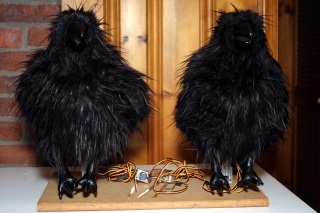
Here are the ravens mounted up for programming:

Now, all I have to do is:

  • Write a script
  • Record the voices
  • Create about a thousand stop-motion animation frames
  • Integrate the animation in with the lighting queues
  • Make a gravestone for the ravens to sit on

I am totaly screwed. Time to start taking vacation days.

About four months ago I had an idea about the ravens doing a kind of Abbott and Costello routine. I planned on writing another so that the birds would have two alternating speils. With one week left, this isn’t going to happen. I need one good short speil.

Over the last several weeks I have been learing to use some new software. There is this lighting queue program called FreeStyler. It’s free and seems to do most things I need it to do. And it’s free!

The most important feature of FreeStyler is its ability to run sequences in parallel. This makes life easy because the bird’s sequence can be started independantly from the other lighting sequences.

Each FreeStyler sequence can be MIDI controlled, so I can plop the audio into Cakewalk along with MIDI events that trigger the lighting queues. This should be easy…

Talking Birds, Part 4

As previously discussed, the first generation talking bird was mechanically larger than the feathers covering it (fur, actually). While I did not have time to improve on the first bird, the second bird will be mechanically more compact.

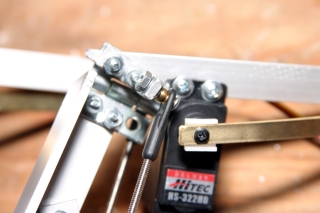
The trick is in how to mount the ball-and-socket rod ends. While the the ball-and-socket allows for the rod to swivel 360° around the pivot point, it allows only a couple of degrees of movement up and down. That is if you screw it down on a flat surface.

I figured out that by cannibalizing a rod end, I could screw the ball down atop another ball. This gives a lot greater freedom of movement. By doing this I’m able to place the rod at a steeper angle; thus, the servo can be placed closer. See the rod end mounted to another ball:

Fascinating, you say? If you had spent 4 hours of your life staring at the end of a threaded rod, you too would find it fascinating.

I know I’m not improving my position, so let’s move on.

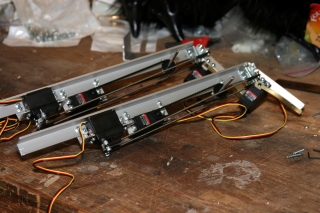
Having made my minor improvements to Rev. 2, we now have two functioning mechanisms:

Note that I also tightened up on the chain. This is an easy thing to do when working with plastic chain. Twist it sideways and the links pop off, allowing you to shorten or lengthen at will. Assuming the chain is perfectly straight in the sprocket, the chain should take quite a bit of tension before it breaks.

How much tension? I have no idea. Doesn’t matter because I have no idea how much torque is required to lift two puppet wings. Let’s hope not much.